Permission to use and distribute this software and its documentation for any
purpose is hereby granted without fee, provided the above copyright notice,
author statement and this permission notice appear in all copies of this
software and related documentation.
THE SOFTWARE IS PROVIDED "AS-IS" AND WITHOUT WARRANTY OF ANY KIND, EXPRESS,
IMPLIED OR OTHERWISE, INCLUDING WITHOUT LIMITATION, ANY WARRANTY OF
MERCHANTABILITY OR FITNESS FOR A PARTICULAR PURPOSE.IN NO EVENT SHALL THE
AUTHOR, THE DIVISION OF ENVIRONMENAL AND EVOLUTIONARY BIOLOGY OR THE UNIVERSITY
OF GLASGOW BE LIABLE FOR ANY SPECIAL, INCIDENTAL, INDIRECT OR CONSEQUENTIAL
DAMAGES OF ANY KIND, OR ANY DAMAGES WHATSOEVER RESULTING FROM LOSS OF USE, DATA
OR PROFITS, WHETHER OR NOT ADVISED OF THE POSSIBILITY OF DAMAGE, AND ON ANY
THEORY OF LIABILITY, ARISING OUT OF OR IN CONNECTION WITH THE USE OR PERFORMANCE
OF THIS SOFTWARE.
Acknowledgments

NDE (NEXUS Data Editor) is a
program to create and edit NEXUS format data files
on computers running Microsoft Windows 95/NT 4.0. The main motivation behind my
writing the program was to provide an easy to use data editor similar to that
provided in the Macintosh program MacClade (note
that NDE has none of the data or tree analysis features of MacClade). The NEXUS
format is becoming more widely used on PCs now that DOS and Windows versions of
PAUP* are available for testing.
In addition to a spreadsheet data editor, NDE makes it easy to fully annotate
the data with both text and pictures, and to have lengthy descriptive character
and character state names. This last feature avoids the constraint imposed by
MacClade of character and state names being being limited to 32 characters.
Hence cryptic phrases such as "ant. temp. marg." (anterior temporal margin) can
be avoided. The ability to have lengthy character names, together with text
comments, means that the data set can be largely self documenting. Indeed, if
suitably constructed the character names and comments can be exported by the
program directly into a file
readable by a word processor, automating the production of character
definitions for publication. NDE can also output
HTML. Although designed as a NEXUS file editor, NDE also has limited support
for other formats, including Hennig86
and DELTA.

NDE is in a very early stage
of development, and there are numerous limitations, not all of which are
mentioned here. In particular, the program will only handle nonmolecular data
sets, such as morphology and behaviour. Molecular data typically poses a
different set of problems (such as alignment), and rarely do individual
molecular characters and states require detailed annotation. The progam
recognises only subset of the NEXUS format, and has these limitations:
- Only supports "STANDARD" data type (i.e., does not support molecular data)
- Limit of 10 states per character
- Only supports ordered and unordered characters
- No character weighting
- No support for taxon sets
- No tree display or analysis functions
Incompatibilities with MacClade
Reading MacClade files in NDE
MacClade is a little less strict in its
adherence to the NEXUS standard than NDE, hence some files created in MacClade
may cause errors in NDE. Look at the output in the Log window for any error
messages. A common problem is that MacClade allows tokens (such as taxon and
character names) to include symbols such as "+" (e.g., interval_4+5_micro.)
whereas NDE does not. NDE will accept such symbols only if the token is enclosed
in single quotes. For example:
| Token |
Can be read by MacClade |
Can be read by NDE |
| interval_4+5_micro. |
yes |
no |
| 'interval 4+5 micro.' |
yes |
yes |
NDE cannot read any pictures stored in the MacClade files. This is because
MacClade stores the pictures in the resource fork of the file, and Windows files
don't have resource forks. 
Downloading and installing the program
 Download NDE from
http://taxonomy.zoology.gla.ac.uk/rod/NDE/nde.html
NDE requires a PC running Windows 95 or NT 4.0 or later. To install the
program unzip the distribution file and run the program SETUP.EXE. You can
delete NDE using the Add/Remove Programs control panel.
 Please register!
Creating a new data file
To create a new data file choose the File |
New command. NDE will create a data matrix with three taxa and one
character.
Opening existing data files
You can open NEXUS files within NDE using
the File | Open command. You can also open document files with the
extension .nex by right-clicking on the document and choosing the Edit in NDE
command on the popup menu:

The spreadsheet window
NDE displays the data in a spreadsheet window.
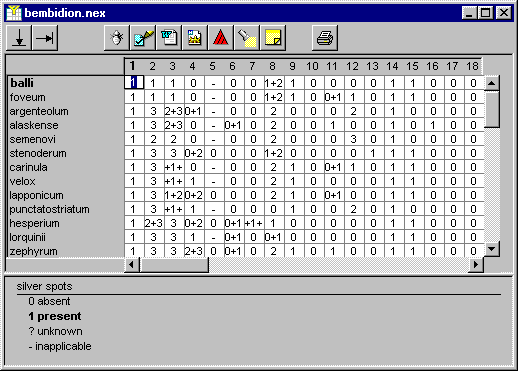
The taxon names are shown in a column on the left; along the top of the
spreadsheet are numbered columns representing the characters. When thecursor is
moved over either the taxon names or character numbers it changes to a finger
 . Clicking the
mouse will display the taxon
(or character)
properties dialog box with the corresponding taxon (character) selected.
When the cursor is over the data sheet the cursor is cross-shaped  . Each cell contains
a coded description of the attributes of a taxon for that character. Typically
the attribute is a single character state. Clicking on a cell activates the data
editor (see the section Entering
data). It also updates the information displayed in the attributes panel
below the spreadsheet.
Attributes panel
This panel displays the character name and states for
the current character, with the states represented by the codes in the cell
highlighted in boldface. You can resize this panel by moving the mouse
over the horizonatl bar separating the panel from the spreadsheet. The cursor
will change to a vertical resize cursor  enabling you to alter the
size of the panel.

The Taxon
Properties dialog box is displayed whenever the user clicks on a taxon name
with the  cursor , or if the
Data | Taxon properties command is chosen. The dialog box displays a list
of all the taxa on the left, and on the right are edit boxes for the taxon name
and comments, and controls to add a picture.
One or more new taxa can be added
using the Add taxa command. In the resulting dialog box simply type in
the number of taxa to create. These will be added to the bottom of the data
sheet with all their attributes set to missing data ("?").
Deleting and
reordering taxa is performed using the Manage taxa dialog box.
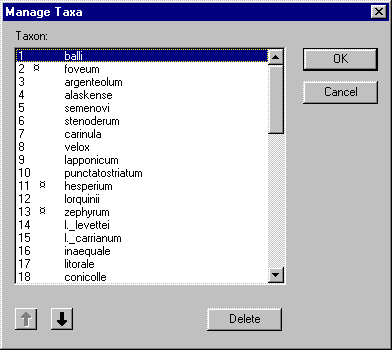
This dialog lists all the taxa in the matrix. If you select a single taxon
you can click on the  (up) and
  (down) buttons to
change its order in the matrix. You can select one or more taxa for deletion by
holding down the Shift key and clicking on the names of the taxa you wish
to delete. Once you've selected the taxa, click on the Delete button to
delete them.
 Warning
- If you click on the Delete button the taxa are deleted from the
list in the dialog box, but not from the data matrix. The taxa are only
deleted once you press the Ok button. However, once you press Ok
the deletion cannot be undone, hence delete taxa with care! If you press
Cancel then no taxa will be deleted.
If the data sheet is larger than
the size of your screen, the taxon of interest might not be visible. The Goto
taxon command enables you to scroll to the desired taxon.

Select the desired taxon from the list and press OK. The selected
taxon wil be highlighted. 
The Character
Properties dialog box is displayed whenever the user clicks on a character
number with the  , or if the
Data | Character properties command is chosen. The dialog box displays a
list of all the characters on the left, and on the right are four tabs
displaying properties of the currently selected character.
Character tab
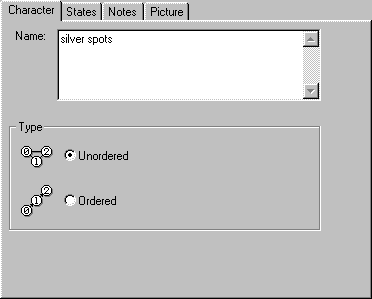
The Character tab displays the full name of the character, which you can
edit. You can also specify whether the character is ordered or unordered (these
are currently the only two types of characters NDE supports).
States tab
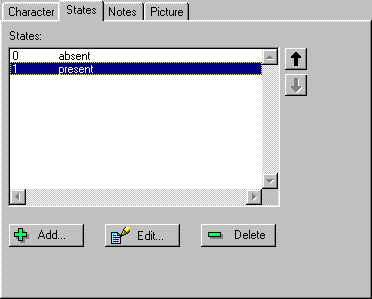
The States tab lists the states for the character. Each state is
listed with the corresponding code used in the data matrix. You can edit or
delete the selected state, or add a new state.
If you delete a character state then the program will recode any taxon that
had that character state as having missing data ("?") , unless the taxon is
scored as polymorphic, in which case the taxon will be assigned the state(s)
remaining after removing the deleted character state.
You can reorder the character states using the  (up) and
  (down) buttons. Note
that the order of the states is only relevant if the character is ordered.
Choosing to edit or add a character state displays a dialog box in which you
can enter the state name, any notes, and a picture. See the section "Annotating
your data" for more information.
One or more new
characters can be added using the New characters command. In the
resulting dialog box simply type in the number of characters to create. These
will be added to the right of the data sheet, and each taxon will be scored as
missing ("?") for this character.
Deleting and
reordering characters is performed using the Manage characters dialog box. This
dialog box is vitrually identical to the Manage
taxa dialog box.

To enter or edit a cell in the
spreadsheet simply click on that cell. The cell's contents are highlighted and
can be edited, and the cursor changes to the edit cursor  . The
corresponding taxon name and character number are also highlighted in
boldface. In the example below, the attributes of taxon albati for
character 2 are being edited.
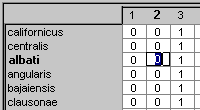
NDE will alow only certain symbols to be entered into a cell, namely the
numbers '0'-'9' which correspond to the allowed character states, the symbols
for missing '?' or inapplicable data '-', and '/' and '+'. These last two
symbols are used to describe polymorphisms; '/' is equivalent to "or," and '+'
is equivalent to "and". For example, scoring a taxon as "0/1" means it has
either state 0 or state 1 for that character; "0+1" means that it has both
states. Once a cell has been edited NDE displays its contents in boldface
so that you know which cells you have edited.
NDE requires that any character state entered in a cell already exists. For
example, if you have a character with two states, '0' and '1', and you attempt
to enter '2' in the cell, the program will complain that '2' is not a valid
state for the character. In order to enter '2' you must first add that state to
the list of states for the character using the Character
properties dialog box.
 Warning
- NDE does not support undo, so edit your data with care. However, pressing
the Esc key will exit the cell without the cell's contents being
changed.
Moving between cells
When editing a cell you can move to adjacent cells
using either the arrow keys, or the tab key.
Fast data entry using autotab
NDE's autotab feature enables you to enter
data and move between cells at the same time. After typing a single symbol the
editor moves to the next cell. Autotabbing is enbabled by depressing either of
the two autotab buttons on the tool bar.


These two buttons determine whether the editor automatically moves to the
right (i.e., the next character for the current taxon), or downwards (i.e., the
next taxon for the current character). Note that in autotab mode you cannot
enter more than one state for a taxon. To switch autotab off, simply click on
the depressed button.
 Attribute properties
If a cell is selected the Attribute properties button
on the tool bar is enabled. Clicking this button displays the Attribute
properties dialog box, in which you can add comments on the contents of the cell
(for example, whether the information is based on your observatons or from the
literature), and add a picture (for example, an SEM of the character in this
taxon). The Notes and Picture tabs display any comments and
picture associated with the observations for this taxon and character. See the
section "Annotating
your data" for more information. 
Within NDE you can add text
comments and pictures to any data element, including taxa, characters, character
states, and taxon attributes.
 Adding text
comments
To add comments simply type text in the edit box. You can type up
to 2048 characters. You can include bibliographic citations, such as those
produced by EndNote (e.g., [Bartschwinkler,
1988 #20]) to document your data.
You can use the comments to make notes about various data elements, such as
"specimen missing left leg", or you can write detailed comments suitable for
publication. NDE can export comments in a format readable by most word
processors, so you do not have to duplicate the effort of commenting your data
in both NDE and a manuscript. See below
for more details.
 Adding
pictures
Although the NEXUS format supports pictures being stored as
separate files, in the resource fork of Macintosh files, or "inline" as a string
of ASCII characters, NDE only implements the first option (separate image
files).
To associate a picture with a data element, click on the  button and select the
desired picture file.

Currently the NEXUS format supports pictures in encapsulated Postscript
(EPS), GIF, JPEG, Macintosh PICT and TIFF formats. NDE stores the name of the
picture file relative to the data file, such that given a data file
c:\data\myfile.nex, the picture file c:\data\images\mypicture.jpeg
is referred to as images\mypicture.jpeg. Because changing the location of
a picture file with respect to the data file will break this link between data
and picture, I suggest that you keep the images together in a folder within the
folder that holds the data file (as in the example above where the folder
images is nested within the folder data).
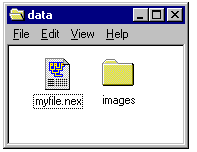
This means that if you move both the folder data (which contains both
the data file and the image folder together) to a new location on your disk, the
program will still be able to find the images.
NDE uses your Web browser (if installed) to display pictures. Clicking on the
View picture button will launch the default browser (if it is not already
running) and attempt to display the picture. If the picture format is not
supported by the browser then you may need to use a helper application to view
the image. For example, GIF and JPEG files can be viewed within your browser,
but TIFF files will probably require an external viewer such as LView or Paintshop Pro, or a plugin.

Character sets are useful tools for
grouping related characters together, such as those from the same sex or
developmental stage. When analysing your data in PAUP you can use characetr sets
to select subsets of your characters for phylogenetic analysis. If you choose
the Sets | Characters menu you will see this dialog box:
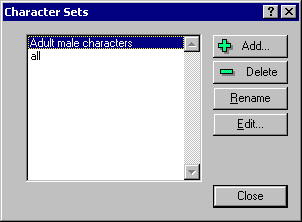
This dialog box displays the current character sets you have defined. You can
Add, Delete, ename, or Edit these sets.

NDE can merge two NEXUS format
files, providing that the files have the identical taxa in them. For example,
you may have two data sets for the same taxa that represent different parts of
the body of your study organism (e.g., head and torso). Using the
File|Merge command you can join these two data sets together.

NDE can generate reports in RTF
and HTML formats. This feature makes it easy to incoporate character
descriptions in manuscripts, and to provide colleages ready access to your data
even if they lack a NEXUS data editor such as NDE or MacClade.
NDE can create a formatted list of
characters and character states for inclusion in a manuscript for publication.
This feature is designed so that you need describe the chacters and their states
only once (within NDE). Rather than retype this information in your manuscript,
you can use the Character report command to produce a Rich Text Format
(RTF) file which can be read by most word processors (such as Microsoft Word,
WordPerfect, etc.) as well as the WordPad accessory that comes with Windows 95.
NDE can create two alternative styles of character report, either a simple
indented list with each character and character state on a new line, or an
indented, numbered list of characters and states, together with any comments you
may have written:

If you are using a bibliographic program such as EndNote, you can include citations to papers in
the comments. These will be written in the RTF file, and hence included in your
manuscript.
NDE can create an HTML report of the data set for viewing
in a Web browser. This provides a convenient way for you (or others) to view the
data and associated notes and pictures.
Any pictures you associate with your data are converted into hyperlinks in
the HTML report. For example, if a taxon has a picture associated with it, then
the name of that taxon is displayed as a hyperlink, and clicking on it displays
the image in a separate popup window. Try it by clicking on this link to see an image of a
beetle (this requires a Web browser that supports JavaScript, such as Netscape
2.0 or above).
 Warning
- At present the HTML report generator assumes that the HTML file will be
saved in the same folder as the data file, otherwise the links to any pictures
will not work.

NDE has limited support for reading and writing DELTA
format files. DELTA (DEsciptive
Language for TAxonomy) is designed to enable taxonomists to store information
about taxa in a form that can be readily converted to natural language
descriptions and taxonomic keys. As such its goal is somewhat different from the
NEXUS format, although the two systems overlap to some extent.
Reading DELTA files
 Warning
- The code to read DELTA files is in an VERY early stage of
development, and is very slow and buggy. Do not expect much at this stage!
NDE recognises a limited subset of the DELTA format. Whereas DELTA
allows five different types of character: ordered (OM) and unordered (UM) mult
istate, integer (IN) and real (RN) numbers, and text (TE) characters, NDE will
import only OM and UM characters. Currently NDE cannot handle implicit character
states, nor does it recognise dependent characters. DELTA is also less
structured than NEXUS, so that comments can be inserted in almost any part of a
data element description. Because of this, NDE will ignore some comments. (to
do: discuss this in more detail).
To import data in DELTA format, choose the Import | DELTA command on
the File menu. NDE will display a dialog box sprompting you for the names
of the CHARS, ITEMS, SPECS and (optionally) the CNOTES files. Click on the  buttons to select the
corresponding files. You will need to have selected at least the CHARS, ITEMS
and SPECS files before the OK button is enabled.
If the DELTA files are successfully read the program will display the
imported data in a spreadsheet window.
Writing DELTA files
NDE can write CHARS, ITEMS, SPECS, and (optionally)
CNOTES files. To export data in DELTA format, choose the Export | DELTA
command on the File menu. NDE will display a dialog box sprompting
you for the names of the CHARS, ITEMS, SPECS and (optionally) the CNOTES files.
Click on the  buttons to specify the corresponding files. I recommend that you use the default
names for these files ("chars", "items", "specs", and "cnotes", respectively).
You may also find it useful to save the DELTA files in a separate folder within
your data folder. Note that you will need to have specified at least the CHARS,
ITEMS and SPECS files before the OK button is enabled.
When writing DELTA files, NDE writes any character comments to the CNOTES
file (if specified); all other comments are written after the corresponding data
element. Pictures are currently not exported.
Importing Hennig86/Tree Gardener files
NDE can import Hennig86
files. Currently NDE will read the data matrix but not the ccode command
(which specifies whether the characters are ordered or unordered). NDE will also
import files created using Tree Gardener. This program
produces Hennig86-style files (with the extension *.mtr) that also contain the
names of the characters and their states. NDE will read and store these names.
Exporting Hennig86 files
NDE can export your data in Hennig86 format. If
a taxon is polymorphic for a character, NDE replaces the polymorphism by a "?".
NDE will include a ccode command specifying the character types.
To export in hennig86 format choose the File | Export | Hennig86
command. For information on using Hennig86 click here.
NDE can export your data as a
simple table. If you choose the File | Export | Simple table command you
will be prompted for a file name. Once you've specified where you want the tabel
saved, NDE displays the following dialog box:
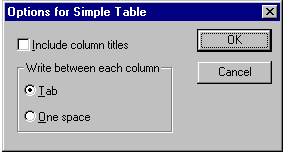
You can specify whether NDE uses the tab character or a
space to separate the characters, and whether you want to include a row of
character names in the table. A table might look something like this:
             1 2 3 4 5 6 7 8 9 10
californicus 0 0 1 1 0 1 0 0 0 0
centralis    0 0 1 1 0 1 0 0 0 0
One use of simple text tables is to import them into a spreadsheet program
(such as Excel) for printing. programs like Excel have much greater flexibility
in formating and printing than does NDE.

Vince Smith's
struggle to find a half way decent program to enter, store and manipulate
phylogenetic data on a PC provided the initial incentive to write the program.
NDE's debt to the Maddison's wonderful program MacClade is
obvious. I also thank David Maddison for providing drafts of Maddison et al.'s
description of the NEXUS format. Mario
Calvacanti kindly made his DELTA Library
code available. I also made use of Leo Breebaart's description
of Microsoft's RTF format, and Smaller Animals Software's ImgDLL
library for displaying images. NDE is written in C++ and compiled using Borland C++
5.01 compiler.


![]()
 Please register!

 . Clicking the
mouse will display the taxon
(or character)
properties dialog box with the corresponding taxon (character) selected.
 . Each cell contains
a coded description of the attributes of a taxon for that character. Typically
the attribute is a single character state. Clicking on a cell activates the data
editor (see the section Entering
data). It also updates the information displayed in the attributes panel
below the spreadsheet.
 enabling you to alter the
size of the panel.
 cursor , or if the
Data | Taxon properties command is chosen. The dialog box displays a list
of all the taxa on the left, and on the right are edit boxes for the taxon name
and comments, and controls to add a picture.

 (up) and
  (down) buttons to
change its order in the matrix. You can select one or more taxa for deletion by
holding down the Shift key and clicking on the names of the taxa you wish
to delete. Once you've selected the taxa, click on the Delete button to
delete them.
 Warning
![]()


 (up) and
  (down) buttons. Note
that the order of the states is only relevant if the character is ordered.

 Warning

 Adding text
comments
 Adding
pictures
 button and select the
desired picture file.


![]()

![]()
 Character reports for publication
 HTML reports
 Warning
 Warning
 buttons to select the
corresponding files. You will need to have selected at least the CHARS, ITEMS
and SPECS files before the OK button is enabled.
 buttons to specify the corresponding files. I recommend that you use the default
names for these files ("chars", "items", "specs", and "cnotes", respectively).
You may also find it useful to save the DELTA files in a separate folder within
your data folder. Note that you will need to have specified at least the CHARS,
ITEMS and SPECS files before the OK button is enabled.

![]()